
Stream with SRT
Set up low-latency SRT streaming with FastPix by configuring the encoder, playback, and simulcast options.
Secure Reliable Transport (SRT) is a cutting-edge protocol designed for low-latency, secure, and reliable live streaming - perfect for broadcasters who prioritize quality and stability. FastPix provides seamless integration of SRT, making it easy to set up and stream content with confidence.
In this guide, we’ll walk you through the setup process for SRT with FastPix, from obtaining your stream details to configuring your encoder and playback.
DEVELOPMENT TIP
SRT is particularly effective when streaming over long distances or across different geographical regions, as it handles network jitter and packet loss much better than traditional protocols.
Activate your account
Create a live stream
Obtain your SRT details in response
Start broadcasting
Configure your encoder
Playback SRT streams
Simulcast SRT streams
Activate your account
To get started with FastPix, activate your account and follow the dashboard setup steps in the Activate Account page. Learn more about creating your account, setting up a workspace, and generating your API credentials (Access Token ID and Secret Key).
Create a live stream
To create a new live stream with FastPix, use the below API reference:
POST request to the create a new stream endpoint.
The username and password that you would use in the POST request can be replaced with your own access token details (Access Token ID and Secret Key).
curl -X POST https://api.fastpix.io/v1/live/streams \
  --user {ACCESS_TOKEN_ID}:{SECRET_KEY} \
  -H 'content-type: application/json' \
  -d '{
    "playbackSettings": {
      "accessPolicy": "public"
    },
    "inputMediaSettings": {
      "maxResolution": "1080p",
      "reconnectWindow": 60,
      "mediaPolicy": "public",
      "metadata": {
        "livestream_name": "fastpix_livestream"
      }
    }
  }'
Let’s talk about the request parameters
accessPolicy: Determines if access to the streamed content is kept private or available to all.
Possible values: public or private
maxResolution: Max resolution can be used to control the maximum resolution your media is encoded, stored, and streamed at. Accepts only 1080p, 720p, 480p resolutions and by default it’s set to 1080p.
reconnectWindow: It mainly works when any network issue occurs. The Reconnect Window determines how long the system waits (in seconds) before declaring a live stream as over; due to a disconnect. If not specified, it defaults to 60 seconds.
mediaPolicy: This flag determines the access policy (public/private) for media content created after the live stream has concluded. It specifies how the recorded stream is handled in terms of availability, permissions, and visibility. Based on the flag's configuration, the media can either be made publicly accessible, restricted to certain users, or archived for internal use. This ensures proper control over the distribution and access of content after the live event has ended.
metadata: Arbitrary user-supplied metadata that is included in the stream details and related webhooks. This can be used to store your own ID for a video along with the livestream. You can have maximum of 255 characters and upto 10 entries are allowed.
Obtain your SRT details in response
You'll receive a SRT URL, Stream Id, and SRT Secret Key in the response.
{
  "success": true,
  "data": {
    "streamId": "be305bebc209db42354fbbb9d764d3e6",
    "streamKey": "44c03bc84f2b79b8a5f2f96053d108a3kbe305bebc209db42354fbbb9d764d3e6",
    "srtSecret": "ab324774e13b124102d8462ad8b41a7ckbe305bebc209db42354fbbb9d764d3e6",
    "trial": false,
    "status": "idle",
    "maxResolution": "1080p",
    "maxDuration": 28800,
    "createdAt": "2025-11-20T08:57:38.743820Z",
    "reconnectWindow": 60,
    "enableRecording": true,
    "enableDvrMode": false,
    "mediaPolicy": "public",
    "metadata": {
      "livestream_name": "fastpix_livestream"
    },
    "lowLatency": false,
    "closedCaptions": false,
    "playbackIds": [
      {
        "id": "34a38110-feb4-49dd-9b59-a277316388ac",
        "accessPolicy": "public"
      }
    ],
    "srtPlaybackResponse": {
      "srtPlaybackStreamId": "playbe305bebc209db42354fbbb9d764d3e6",
      "srtPlaybackSecret": "43669335353837426fbf68c8877dd9e8kbe305bebc209db42354fbbb9d764d3e6"
    }
  }
}
Here, srtSecret is the SRT Secret Key (passphrase) used in relation to the SRT protocol for secure live stream broadcasting. This key ensures encrypted transmission of media over the SRT connection, safeguarding the stream from unauthorized access or tampering.
From the API response you would also need the streamId which is a unique identifier assigned to the stream after it is created.
Playback for SRT stream is different compared to RTMPS streams. To playback your SRT stream you need to use the below parameters from the response:
SrtPlaybackStreamId: A unique identifier used to reference and manage a specific SRT (Secure Reliable Transport) playback stream.
SrtPlaybackSecret: A secret key used to authenticate and secure access to the SRT playback stream.
Here are the other parameters explained from the response:
streamKey:
A stream key is a string of characters generated by FastPix when you create a live stream event. This string acts like a unique identifier or password, which is necessary to link your broadcasting software (like OBS, vMix) with FastPix.
Note
This is not required for SRT.streamKeyis only valid when you want to stream with RTMPS.
trial:
The flag indicates whether the organization you logged into is subscribed to either the enterprise plan or the test plan. The system automatically fetches the organization’s plan status and assigns a value based on this subscription.
NOTE
PATCH and Simulcast functionalities won’t work for test streams (i.e. when provided
true).
maxDuration:
This setting defines the maximum time limit for which a customer can conduct a live stream. After the live stream reaches this time limit, it automatically stops. This feature is particularly useful for managing resources and ensuring that streams adhere to the plan's restrictions.
- Depending on the organization's plan, the system retrieves a
maxDurationvalue. - For organizations with a test plan, the maximum duration is 300 seconds (5mins).
- For users on a Pay as you go plan, the maximum allowed duration is 28,800 seconds (8 hours).
status:
It gives you the current live stream status.
idleindicates that no live stream is currently in progress (the stream hasn't started yet).preparingsignifies that the stream is in the preprocessing phase, preparing to transition to the active state.activemeans that the live stream is ongoing (the video is currently being streamed).disabledmeans that streaming has been stopped, and no further streams can be published.
NOTE
After the stream ends, the status updates from
activetoidle. If streaming resumes, it switches back toactive. This cycle continues as long as the stream stays within the time limit.
- The status gets updated to
disabledif the duration limit reaches.- The stream is no longer accessible after it is disabled.
createdAt: It displays the UTC date-time when the live stream is created.
enableRecording:
This value indicates whether the live stream is being recorded, allowing it to be saved and accessed later. By default, the system returns true in the response, meaning that all live streams are recorded automatically.
Recording live streams is beneficial for creating archived content, allowing users to replay the stream later, or providing access to those who missed the live event.
playbackId: It is an array of playback ids for a live stream. playbackId in FastPix's Live Stream API work just like those for a video media. They allow you to do things like play live stream , grab thumbnails from a video, or make timeline hover previews with your player.
enableDvrMode: If true, enables DVR (time-shifting) mode for the live stream, allowing viewers to pause, rewind, or fast-forward during the live broadcast. Requires the stream to support DVR; the playback URL must include dvrMode=true to enable time-shift controls.
lowLatency: Enables low-latency streaming mode. When enabled, end-to-end delay is minimized.
closedCaptions: Indicates whether closed captions are enabled for the livestream.
Start broadcasting
To start live streaming, you or your users need software capable of pushing a SRT stream. This software is configured using the Stream Key obtained earlier, along with FastPix's SRT server URL: srt://live.fastpix.io:778
The above URL is the standard entry point to stream SRT live with FastPix. This is compatible with almost every streaming applications and services.
You need to construct the this URL by appending the necessary parameters to the URL. The format is:
srt://live.fastpix.io:778?passphrase=<SRT Secret Key>&streamid=<Stream Id> Replace <SRT Secret Key> and <Stream Id> with the values from your API response. You can also find this information on the FastPix Dashboard.
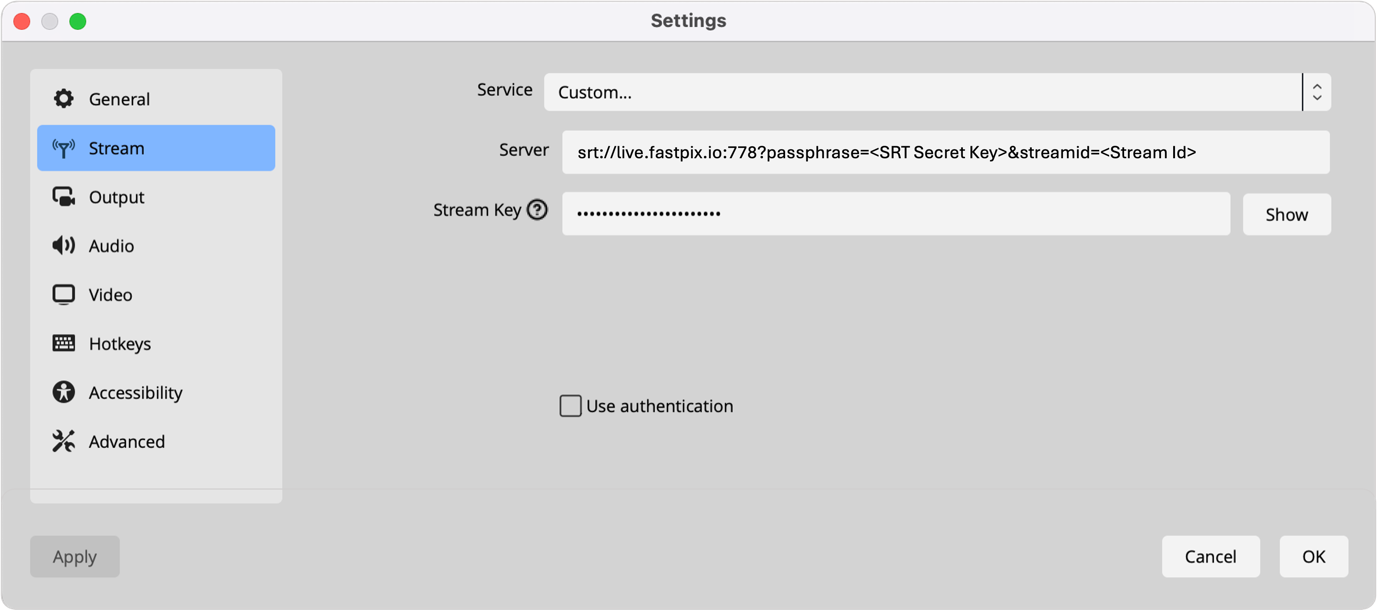
Configure your encoder
After you construct the SRT server URL, configure your streaming encoder in your broadcasting software. For example, using an open-source broadcasting software like OBS Studio :
- Open OBS Studio.
- Navigate to Settings > Stream.
- Set the Service to “Custom”.
- In the Server field , paste the constructed SRT Server URL (for example, srt://live.fastpix.io:778?passphrase=<SRTSecretKey>&streamid=<streamId>).
- In the passphrase field, paste the SRT Secret Key you received from FastPix.
- Save the settings and start streaming!
DEVELOPMENT TIP
Always test your stream before going live! This ensures everything is configured correctly and helps avoid any last-minute issues.
Playback SRT streams
Playback of SRT streams is more complex compared to other protocols. But you can playback your SRT streams by first constructing the playback URL in the below format. You can also find this URL on the live stream detail page.
srt://live.fastpix.io:778?streamid=<playbackStreamId>&passphrase=<srtPlaybackSecret>From the API response, use the values provided to you under srtPlaybackResponse to:
- Replace
{playbackStreamId}with "play" followed by yourstreamId. - Replace
{srtPlaybackSecret}with the passphrase from your stream response.
Integrate into product
If you are a developer integrating SRT playback into your application, FFmpeg is a powerful solution. It allows you to handle real-time streaming efficiently and can be customized to fit your application's requirements.
Use the following command to play the stream:
ffplay -analyzeduration 1 -fflags -nobuffer -probesize 32 -sync ext '<SRT_PLAYBACK_URL>'FFPlay is a command-line player built on FFmpeg, which supports SRT playback.
Ensure FFmpeg is installed on your system. Replace <SRT_PLAYBACK_URL> with your actual SRT playback URL.
View or test SRT streams
If you only need to view the stream without integration, VLC Media Player is a simpler alternative that supports SRT playback. Just open VLC, go to Media → Open Network Stream, and enter your SRT playback URL to start watching.
NOTE
The live stream detail page in the dashboard shows a FastPix player configuration. When used, it displays an HLS stream when the SRT stream is triggered.
Simulcast SRT streams to social platforms
Simulcasting allows you to broadcast your SRT stream to multiple platforms (for example, YouTube, Twitch, Facebook) simultaneously. Using FastPix, you can send a primary SRT stream, which converts it to RTMPS streams for compatibility with third-party platforms that require RTMPS.
- Create a livestream and create multiple simulcast targets for it. You can refer to the guide on simulcasting to social platforms.
- Configure your broadcasting software (for example, OBS) by providing the FastPix SRT URL
(for example,
srt://live.fastpix.io:778?streamid=<StreamID>&passphrase=<Passphrase>) and the Stream Key in the OBS through Settings > Stream > Service, and set the Service to Custom.
- In OBS, click Start Streaming, the primary SRT stream is sent to FastPix, which processes it and pushes RTMPS streams to the configured platforms (YouTube, Twitch, Facebook).
NOTE
Platform Compatibility: YouTube, Twitch, and Facebook require RTMP(S) ingestion. FastPix converts the SRT stream to RTMP(S) for these platforms.
Tips for optimal streaming
To ensure your live stream runs smoothly and reliably, here are a few tips:
- Low Latency: SRT is optimized for low-latency streaming. However, network stability is key. Always prefer using a wired connection over wireless for better performance.
- Adjust parameters: Configure your encoder’s bitrate and resolution to match your audience’s expectations. Higher bitrate and resolution can improve quality but require more bandwidth.
- Monitor your stream: The FastPix Dashboard provides detailed monitoring for your livestream. Keep an eye on your stream’s connection stability, viewer statistics, and any performance alerts.
Troubleshooting common issues
If you run into issues while using SRT with FastPix, here are a few troubleshooting steps to try:
- Connection errors: Double-check that the SRT URL, Stream Key, and Passphrase are entered correctly. Even a small typo can break the connection.
- Low-quality stream: If the stream quality is poor, try adjusting your encoder’s bitrate or resolution settings for better video performance.
- Playback issues: Verify that your playback URL includes the correct stream ID and passphrase. Test the URL in a supported media player.
If the issues persist, don’t hesitate to reach out to FastPix Support for further assistance.
Updated 5 months ago