
Create clips from existing media
Extract video segments from existing FastPix media using startTime and endTime to create independent, streamable clips through API or dashboard.
The FastPix clipping API lets you extract precise segments from any video in your library and save them as independent, playable media. Each clip gets its own media ID and playback ID, so you can stream, share, or embed it independently from the source video.
This guide explains how to create shorter video clips from media that's already uploaded to FastPix. You can extract any segment from a video by specifying a start time and end time.
Common use cases include:
- Social media highlights and teaser clips
- Promotional content and trailers
- Educational segments and course modules
- Webinar recaps and meeting snippets
- Sports highlights and event moments
- Repurposed content for different platforms and audiences
Before you begin
Before creating a clip, make sure you have:
- A FastPix account with an active Access Token ID and Secret Key. See Activate your FastPix account.
- At least one video already uploaded and processed in your FastPix workspace. You need the media ID of that video. See the VOD quickstart if you haven't uploaded a video yet.
- Both the source video and the clip destination must be in the same workspace.
NOTE:
Clipping only works with existing FastPix medias. You cannot clip a video from an external URL using this feature.
How clipping works
To create a clip, you send a POST request to the
create media from URL endpoint, the same endpoint used for uploading videos from a URL. The difference is in the url field: instead of a standard video URL, you provide your source media ID with a special fp_mediaId:// prefix.
FastPix reads the segment between startTime and endTime from your source video, encodes it as a new media, and returns a new media ID and playback ID for the clip.
If you prefer hands-on instructions, the Create Clip recipe walks you through the entire process.
POST https://api.fastpix.io/v1/on-demandHow the url field works for clipping:
| Value | What it does |
|---|---|
https://example.com/video.mp4 | Uploads a new video from an external URL |
fp_mediaId://{MEDIA_ID} | Creates a clip from an existing media asset |
Create a clip using the API
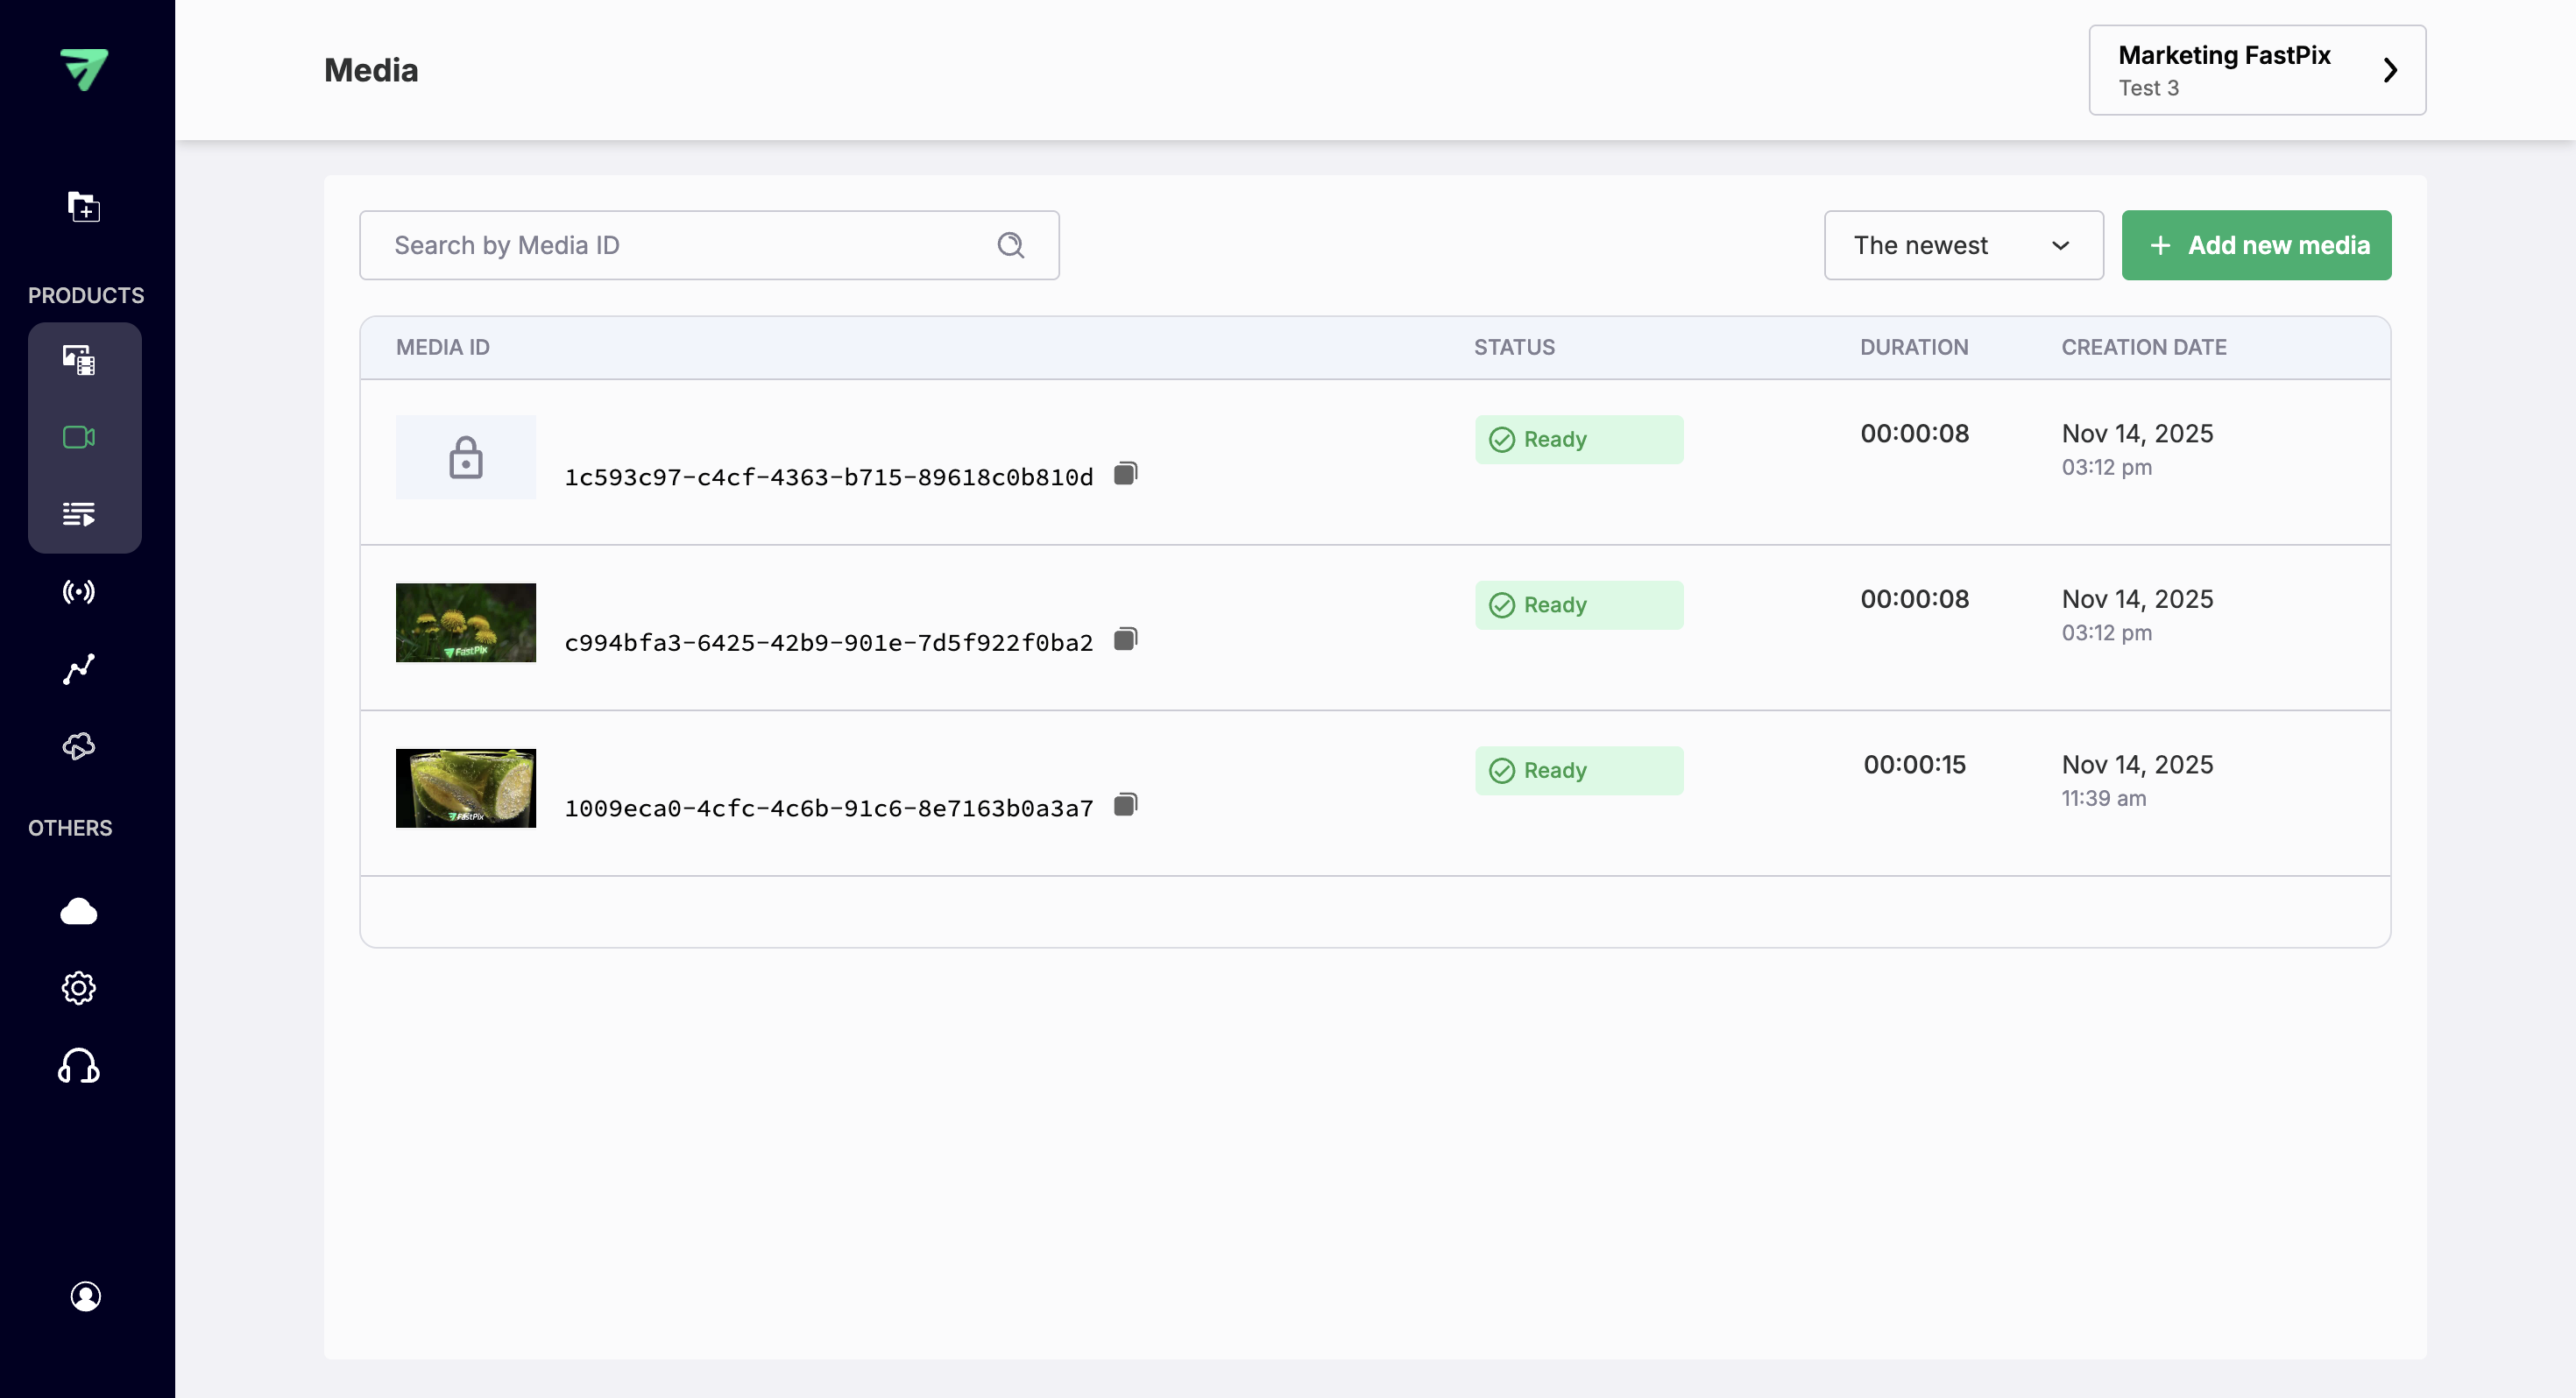
1. Get your source media ID
You need the media ID of the video you want to clip. You can find it in the FastPix dashboard under Products > Media, or retrieve it programmatically from a previous API response.
A media ID looks like this: 5cfe8b2d-1c3a-4685-bd05-10fbc54c0015
2. Send the clip request
Make a POST request to the /v1/on-demand endpoint. Set the url field to fp_mediaId:// followed by your source media ID, and specify startTime and endTime in seconds.
Replace {MEDIA_ID} with your actual values.
Request
{
  "inputs": [
    {
      "type": "video",
      "url": "fp_mediaId://{Media_ID}",
      "startTime": 0,
      "endTime": 60
    }
  ],
  "accessPolicy":"public"
}
Request body fields
| Field | Type | Required | Description |
|---|---|---|---|
type | string | Yes | Must be "video" for clipping. |
url | string | Yes | Your source media ID with the fp_mediaId:// prefix. Example: fp_mediaId://5cfe8b2d-1c3a-4685-bd05-10fbc54c0015 |
startTime | number | No | Start of the clip, in seconds from the beginning of the source video. Defaults to 0. |
endTime | number | No | End of the clip, in seconds. Defaults to the full duration of the source video. |
accessPolicy | string | No | Set to "public" to allow anyone with the playback URL to stream the clip, or "private" to restrict access. Defaults to "private". |
Tip: If you omit both
startTimeandendTime, FastPix creates a full copy of the source video as a new media asset.
3. Check the response
A successful request returns HTTP 201 Created with a response body containing the new clip's media ID and playback ID.
Response
{
  "success": true,
  "data": {
    "id": "1cb4c22f-d9f6-4019-8905-30e6784ec87b",
    "sourceMediaId": "5cfe8b2d-1c3a-4685-bd05-10fbc54c0015",
    "trial": false,
    "status": "Created",
    "createdAt": "2025-12-22T09:06:14.849415Z",
    "updatedAt": "2025-12-22T09:06:14.849435Z",
    "playbackIds": [
      {
        "id": "652d5f58-5080-4459-b0bf-4250e9b71060",
        "accessPolicy": "public",
        "accessRestrictions": {
          "domains": {
            "defaultPolicy": "allow",
            "allow": [],
            "deny": []
          },
          "userAgents": {
            "defaultPolicy": "allow",
            "allow": [],
            "deny": []
          }
        }
      }
    ],
    "mediaQuality": "standard",
    "title": "5cfe8b2d-1c3a-4685-bd05-10fbc54c0015",
    "sourceAccess": false,
    "maxResolution": "1080p",
    "inputs": [
      {
        "type": "video",
        "url": "fp_mediaId://5cfe8b2d-1c3a-4685-bd05-10fbc54c0015",
        "startTime": 0,
        "endTime": 60
      }
    ],
    "optimizeAudio": false
  }
}
Key fields in the response:
| Field | Description |
|---|---|
data.id | The media ID of your new clip. Use this to manage or delete the clip. |
data.sourceMediaId | The media ID of the original source video. |
data.status | Processing status. Changes from "Created" to "Ready" once the clip finishes encoding. |
data.playbackIds[].id | The playback ID for streaming the clip. Use this to construct a playback URL. |
4. Wait for the clip to become ready
readyClip encoding happens asynchronously. The clip's status starts as "Created" and changes to "Ready" when it's available for playback.
The most reliable way to detect when a clip is ready is with webhooks. Listen for the video.media ready event on your webhook endpoint. See Set up webhooks for instructions.
Alternatively, poll the Get media by ID endpoint and check the status field. Don't poll more than once per second.
5. Play the clip
After the clip status is "Ready", create a playback URL using the playback ID from the response:
https://stream.fastpix.io/{PLAYBACK_ID}.m3u8You can use this URL with any HLS-compatible player, including the FastPix player.
Create a clip using the FastPix dashboard
If you prefer a visual interface, you can create clips directly from the FastPix dashboard without writing any code.
-
Open the FastPix dashboard and go to Products > Media.
-
In the media list, select the video you want to clip.
-
On the Media details page, click the Create Clips tab.
-
Enter the Start time and End time for your clip in seconds.
- Use the Preview Clip button to watch the exact segment before creating it.
- Drag the red (start) and green (end) timeline handles to fine-tune your selection.
- Use the Zoom In (+) and Zoom Out (–) buttons to adjust the timeline view for more precision.
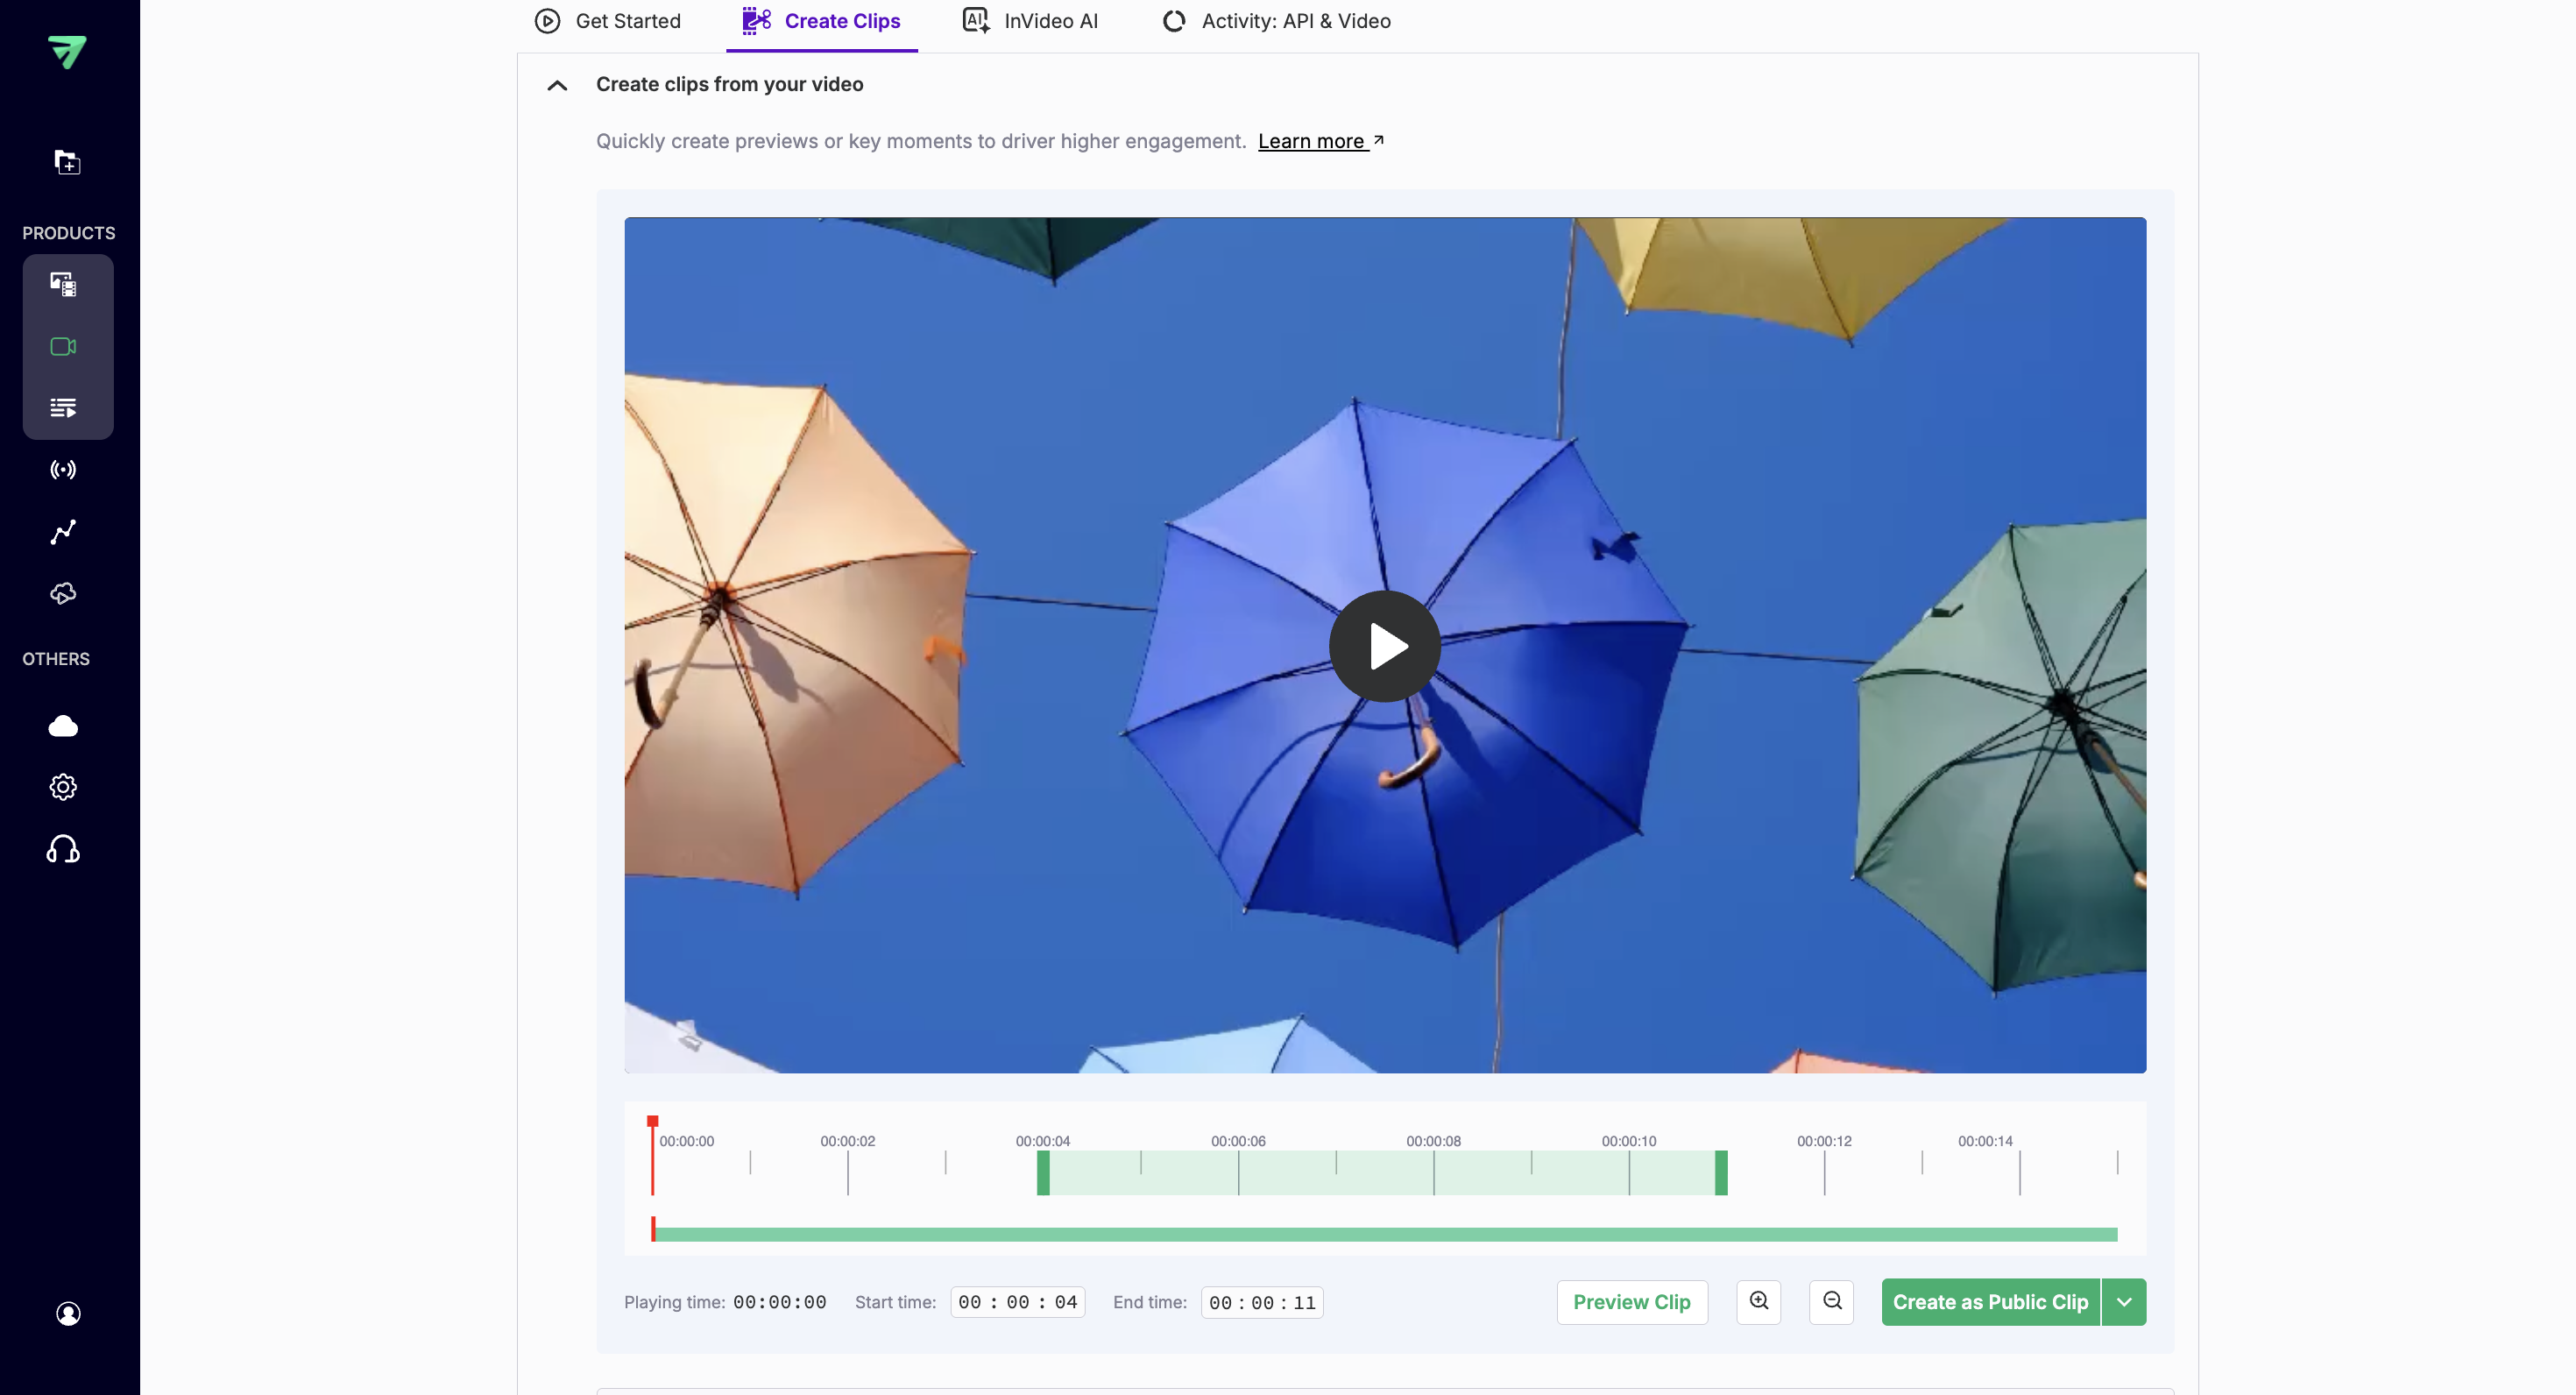
- Choose your access policy from the dropdown next to Create as Public
Clip:
- Public: Anyone with the playback URL can stream the clip.
- Private: Access is restricted according to your workspace access policy.
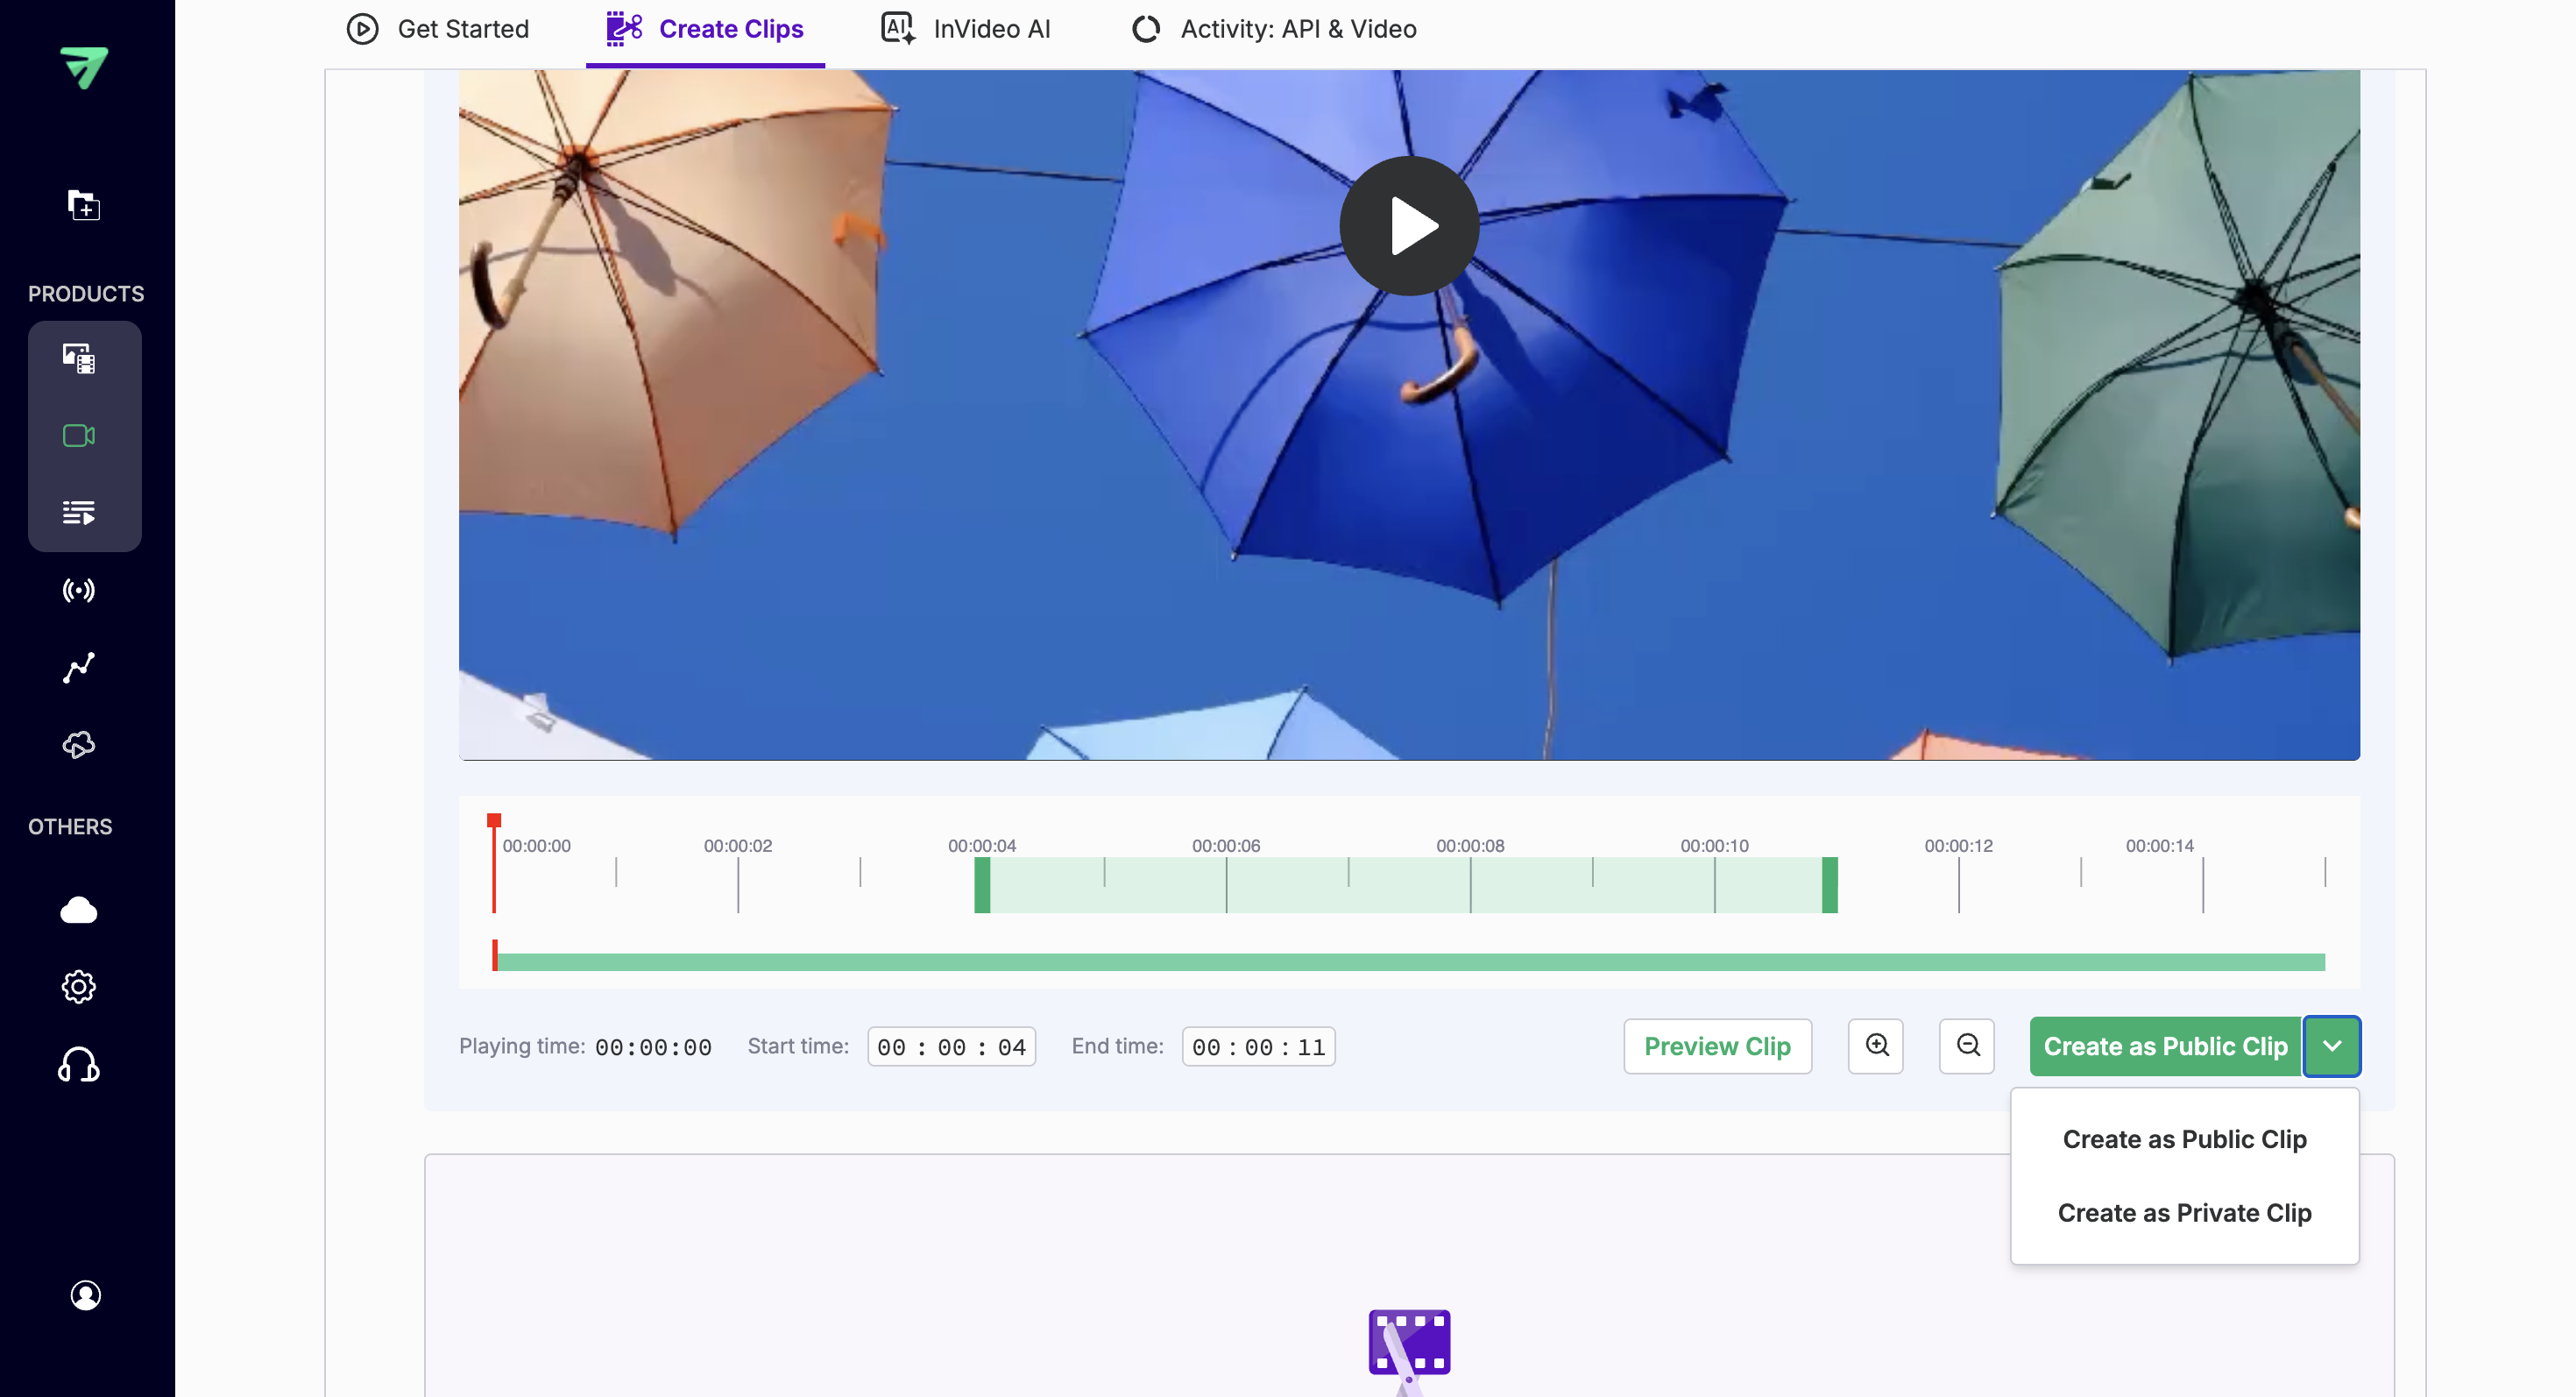
- Click Create Clip. FastPix processes and encodes the segment.
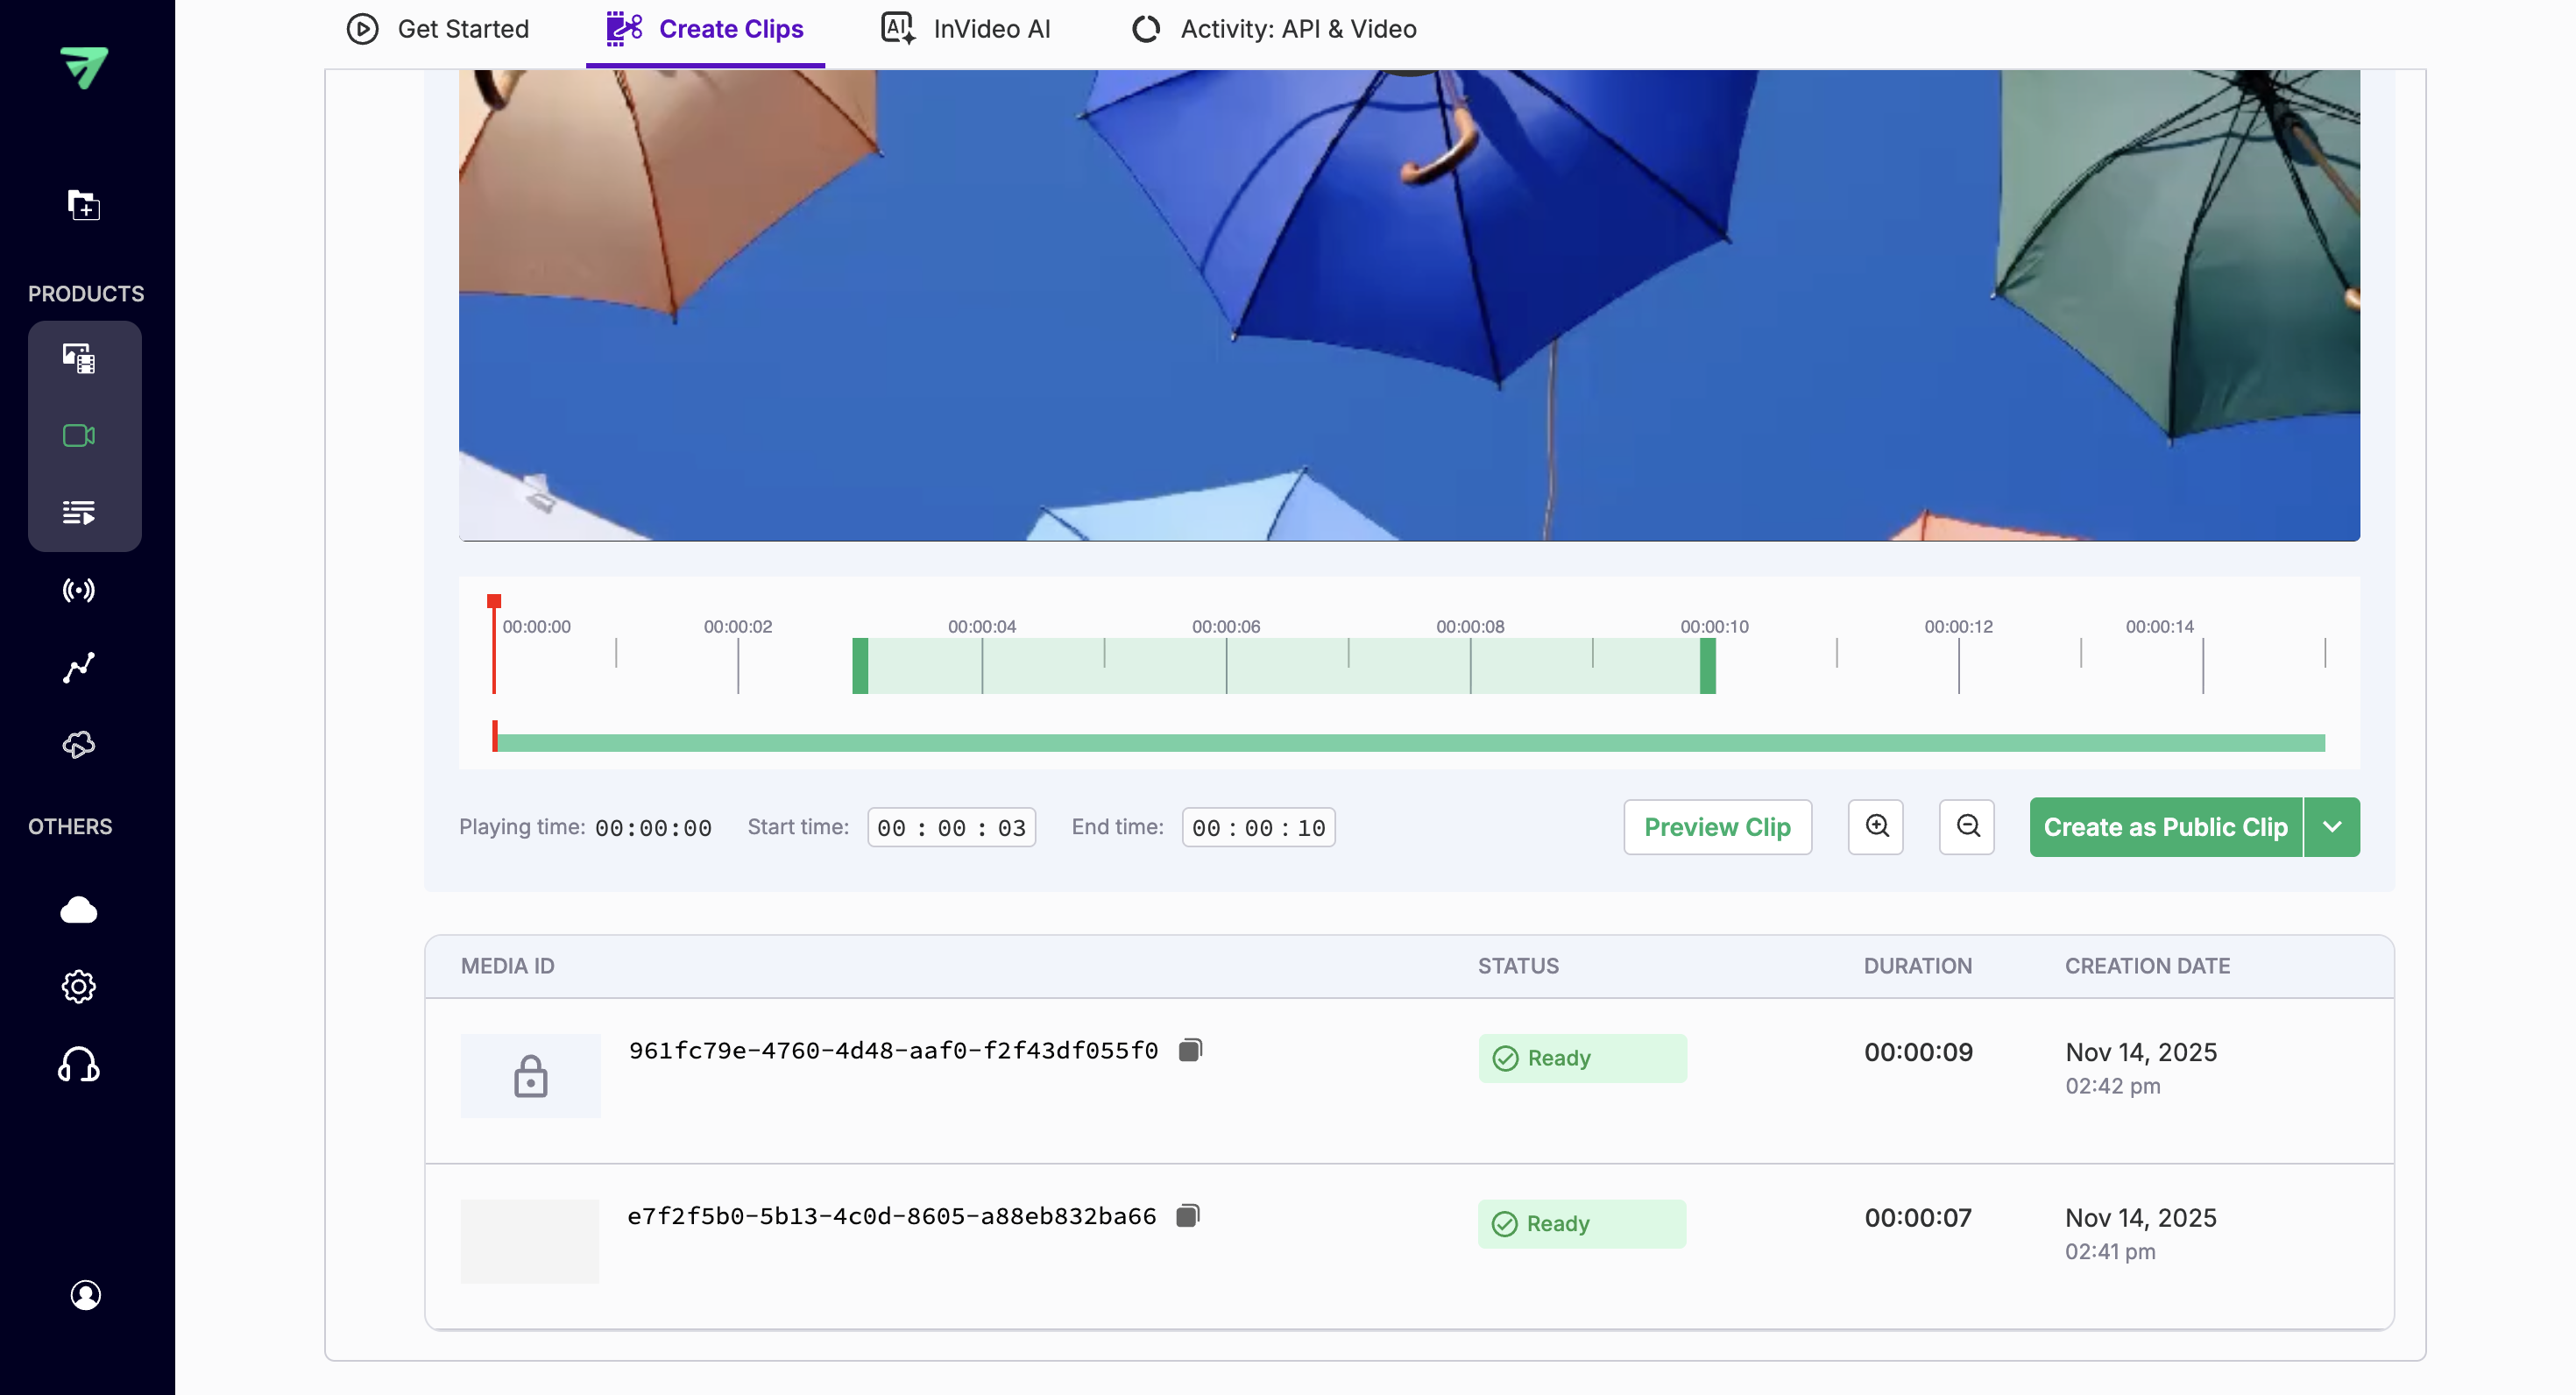
- The clip appears in your Media list as a new entry. Select it to view its Playback IDs and confirm its access settings.
Retrieve all clips from a source video
To get a list of all clips created from a specific video, use the Get all clips of a media endpoint and provide the original video's media ID.
Replace {ACCESS_TOKEN_ID} and {SECRET_KEY} with your actual values.
Request
curl -X GET 'https://api.fastpix.io/v1/on-demand/{MEDIA_ID}/clips' \
  --user '{ACCESS_TOKEN_ID}:{SECRET_KEY}'
Response
{
    "success": true,
    "data": [
        {
            "id": "80906e5f-2909-4191-bbbb-b7280413022d",
            "duration": "00:00:05",
            "status": "Ready",
            "thumbnail": "https://images.fastpix.io/11d81d70-615c-4d5c-a93a-28c5de14d117/thumbnail.png",
            "createdAt": "2025-10-29T09:58:21.828358Z",
            "playbackIds": [
                {
                    "id": "11d81d70-615c-4d5c-a93a-28c5de14d117",
                    "accessPolicy": "private"
                }
            ]
        },
        {
            "id": "2aea2dea-f67d-4839-bd26-4337baa95141",
            "duration": "00:00:05",
            "status": "Ready",
            "thumbnail": "https://images.fastpix.io/9417aa80-da6b-44bf-95ef-816bd7e494b4/thumbnail.png",
            "createdAt": "2025-10-29T09:58:17.776712Z",
            "playbackIds": [
                {
                    "id": "9417aa80-da6b-44bf-95ef-816bd7e494b4",
                    "accessPolicy": "public"
                }
            ]
        }
    ],
    "pagination": {
        "totalRecords": 2,
        "currentOffset": 1,
        "offsetCount": 1
    }
}
The response returns each clip's media ID, duration, processing status, thumbnail URL, and playback IDs. Use the pagination object to page through large result sets.
Troubleshooting
The API returns an error about an invalid URL.
Make sure the url field in your request body uses the exact formatfp_mediaId://{MEDIA_ID}, including the fp_mediaId:// prefix and no trailing whitespace. Confirm the media ID exists in your workspace.
The clip status stays "Created" and never becomes "Ready".
Check the status field on the source video. Clipping only works when the source video's status is "Ready". If the source is still processing, wait for it to finish before creating a clip.
The clip is in a different workspace than the source video.
Clipping is only supported within the same workspace. Both the source media and the clip must reside in the same workspace.
The clip duration is wrong.
Make sure startTime is less than endTime, and that both values fall within the actual duration of the source video. Times outside the video duration are clamped to the video bounds.
What's next
- Create a clip, step-by-step recipe: A hands-on walkthrough of the full clipping workflow.
- Add timeline hovers using spritesheets: Show thumbnail previews as viewers scrub through your clip.
- Instant live clipping: Clip segments from a live stream while it's still broadcasting.
Updated 2 months ago