
Stream pre-recorded live
Learn how to setup live stream for pre-recorded videos.
FastPix enables you the functionality to stream live by using a pre-recorded video instead of actually going live. This is often termed as “Simulated live”.
Simulated live, also known as simulated live streaming, or simulated live events, refers to a technique used in live streaming where pre-recorded content is broadcasted as if it is happening live. This technique is often used to provide a seamless and engaging viewing experience for audiences, particularly in scenarios where it may not be practical or feasible to conduct a live broadcast.
NOTE
Pre-recorded live workflows differ from cloud playout channels. To understand how cloud playout works, read our blog.
We’ve seen strong demand for cloud playout across our customer base, which has helped shape our view of where the industry is headed and we’re building towards it. Cloud playout in FastPix is currently in beta, and we’re excited to make it available soon for teams with relevant use cases.
Set up a live stream
To start a live stream, first, send an API request to FastPix to create a new live stream. In response, you’ll receive your stream details, including the Stream Id and Stream Key to construct the Server URL. You also get your Playback IDs.
Read our detailed guides for setting up a live stream:
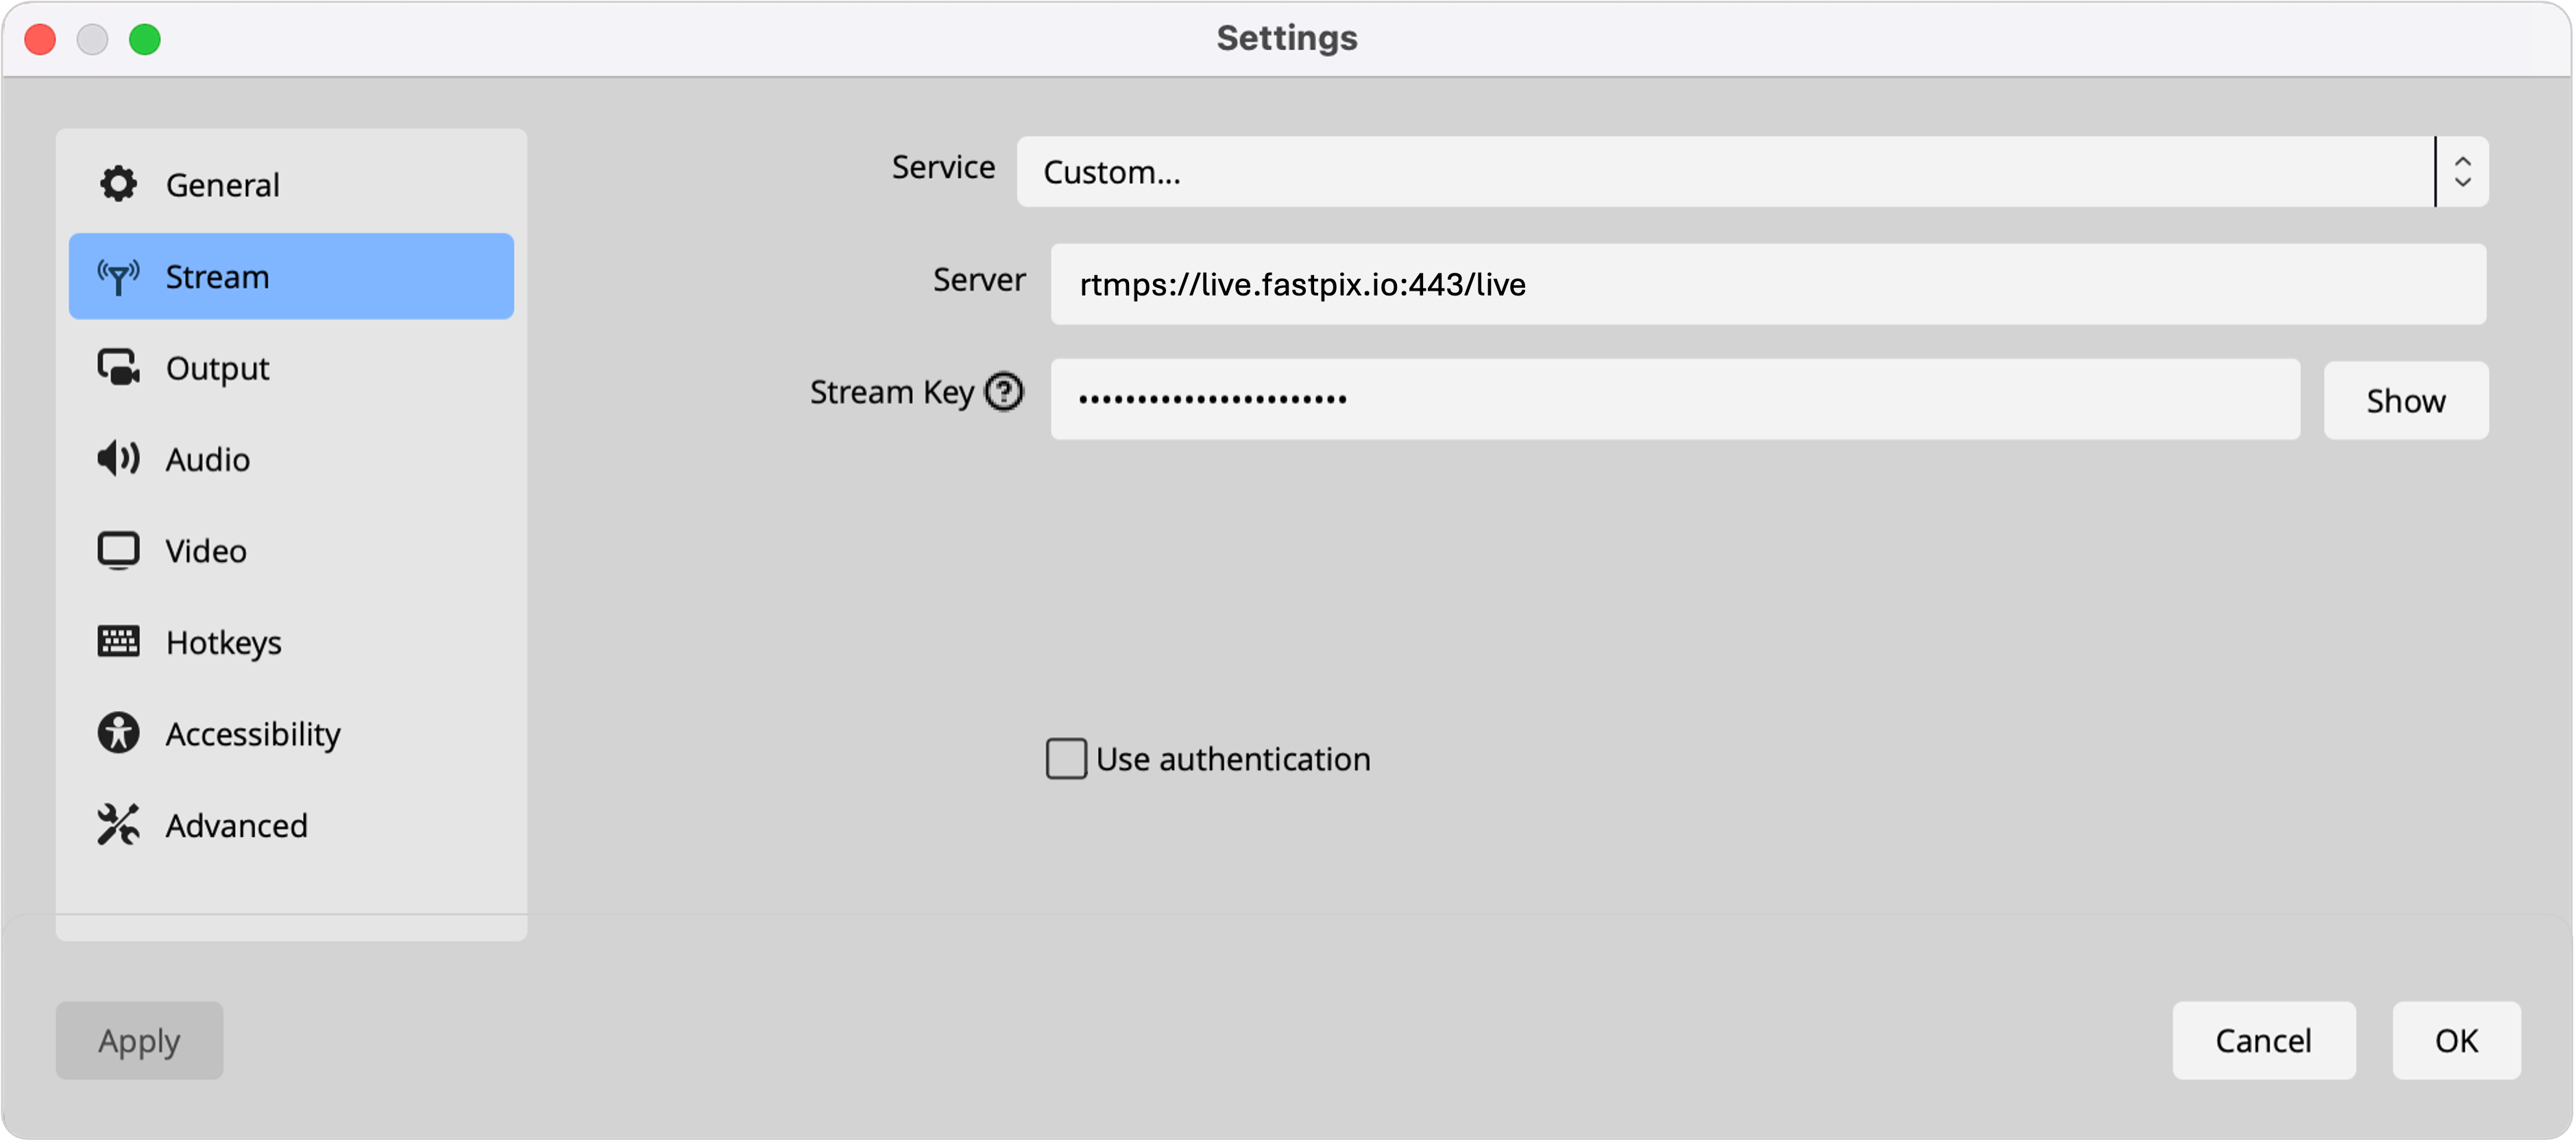
FastPix provides stream key/secret for both RTMPS and SRT, allowing you to choose the protocol that best fits your setup. In the next step, you would need to use OBS Studio (or any broadcasting software) and enter the Server URL and Stream Key (from API response) in the streaming settings to establish a connection.
RTMPS server URL: rtmps://live.fastpix.io:443/live
SRT server URL: srt://live.fastpix.io:778
The above URLs are the standard entry points to stream live with FastPix. This is compatible with almost every streaming applications and services.
For this guide we are using OBS, which is free and open-source. Here's how to stream using OBS :
If you're not using OBS, the software you use for broadcasting will guide you on how to start and stop an live stream session. Once you begin the session, the software will send live video to FastPix. At that point, the FastPix live stream status changes to active, showing that it's receiving the RTMPS / SRT stream and ready to play using the Playback ID.
Stream simulated live (recorded or stored video)
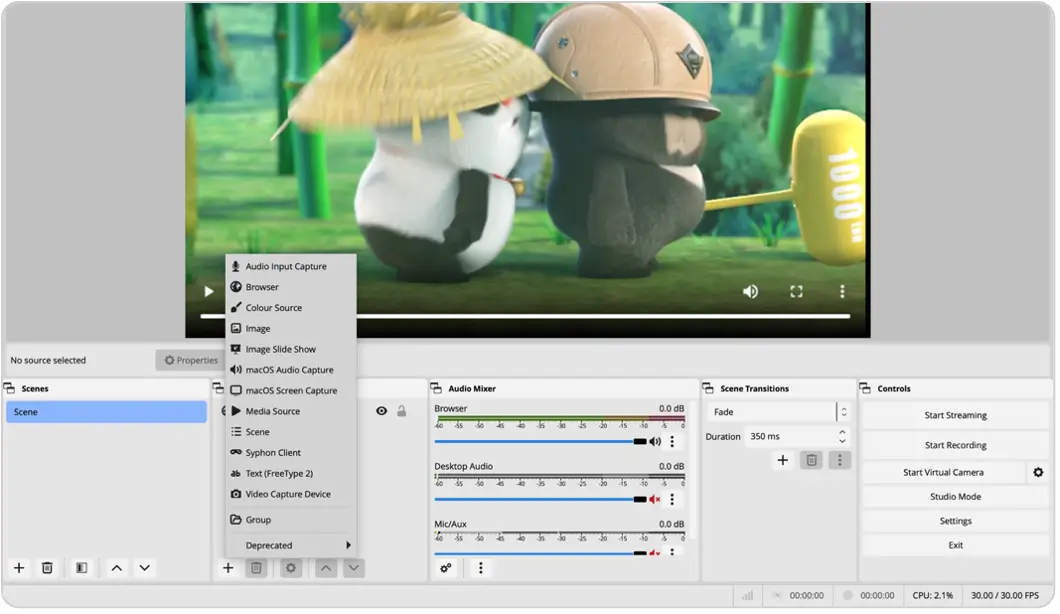
You can achieve simulated live streaming using OBS (Open Broadcaster Software). Here's how you can do it:
- Pre-record your content: First, you'll need to pre-record the content you want to stream as if it were live. This could be a presentation, webinar, or any other type of event.
- Set up OBS: After you've entered your Server URL and Stream Key in the streaming settings, your broadcasting software would be ready to establish a connection.
- Create a scene: In OBS, create a new scene by clicking on the "+" icon under the Scenes section. You can name your scene appropriately.
- Add Your pre-recorded video: In the newly created scene, add your pre-recorded video as a media source. Click the "+" icon under the Sources section and select "Media Source". Then browse and select your pre-recorded video file.
- Configure settings: Adjust the settings of your video source as needed. You may want to set looping options or adjust the audio settings.
- Test your setup: Before going live, it's essential to test your setup to ensure everything is working correctly. Preview your scene in OBS and make any necessary adjustments.
- Start streaming: When you're ready to start your simulated live stream, click on Start Streaming. This would connect the stream with FastPix live stream.
- Start playback: At the scheduled start time of your stream, start playback of your pre-recorded video in OBS. OBS will stream the video to the FastPix live stream you created as if it is happening live.
Playback the simulated live stream
To watch a live stream, use the unique PLAYBACK_ID you received when setting up the live stream, along with stream.fastpix.io, to get the URL for playback using HTTP Live Streaming (HLS).
https://stream.fastpix.io/{PLAYBACK_ID}.m3u8If you have an SRT stream to playback, then you’ll need to construct the playback URL in the following format:
srt://live.fastpix.io:778?streamid={playbackStreamId}&passphrase={srtPlaybackSecret};Replace {playbackStreamId} and {srtPlaybackSecret} with the values provided to you under srtPlaybackResponse from the API response. You can use this URL in any SRT-compatible player to view your livestream.
If you wish to playback the live stream in FastPix player by integrating into your development project, you can use the below JavaScript SDK to install through CDN.
To install through npm (Node Package Manager) click here .
<script src="https://cdn.jsdelivr.net/npm/@fastpix/fp-player@latest/dist/player.js"></script>

<fp-player
  stream-type="live-stream"
  playback-id="{playbackId}"
  primary-color="#F5F5F5"
  accent-color="#5D09C7"
  secondary-color="#000000"
/>
For step-by-step guidance on integrating with our video player, refer to the playback guide .
After everything is set up, you can also integrate FastPix Data into your player to keep track of how the playback is performing.
Stop stream broadcasting
You can stop the broadcast software to disconnect from the FastPix servers. If any reconnect_window time was given as input and the time runs out, then the live stream changes its status to idle.
Learn more about reconnect window .
Note that, live streams automatically gets disconnected after 8 hours. For any specific scenarios or requirements where you need more than 8 hours live streams - Contact us.
Updated 4 months ago